
Showing posts with label cooking. Show all posts
Showing posts with label cooking. Show all posts
Sunday, April 20, 2014

Thursday, January 5, 2012
Corn already?
Baby corn! 'Mini Pop F1,' to be exact.
These you are supposed to harvest as soon as you see a hint of the silks, but I forgot at first and left them a little longer.

Still, it didn't seem to matter and they were still tender inside and a little bigger for longer on the plant. Uncooked they were on the bland side, but once steamed they were delicious and nicer than anything we've bought in a supermarket before.

So far, out of the first block of 20 seeds sown, I have harvested 13 baby corns (I am keeping track of harvests with weights and numbers properly, for once!) I have also sown more baby corn successionally, so there are small, medium, and fully grown plants now, and yet more seeds in the packet for another round in a month or so.

We ate our corns together with a stirfy including yet more Redlegs spring onions (these just keep on coming and getting bigger and bigger. They were planted with a well over-packed punnet bought at a shop, but now I have seeds which I am also successionally sowing;

And a couple more Lebanese eggplants. These are small, but I am wary of letting them get too big and becoming inedible.

And in tomato news? The plants are still going great guns. My early planting of bought-in largish 'seedlings' has proved fruitful to say the least. I have picked almost 4kg in the last fortnight - not including the ones eaten while gardening and never weighed.
Some we eat fresh, some we cook into dinner, some have been frozen whole to cook with later in the year, and some I'm attempting to dry in the oven.
The tomatoes towards the top of this picture are either Tigerella or Green Zebra. I have managed to lose the label (I think it might have blown behind a pile of inaccessible renovation bits and bobs in the shed). The ones at the bottom of the picture are small Grosse Lisse. Now, those stripey numbers are a little on the bitter side if they're not totally ripe, I've found, so they were my chosen candidates for oven-drying (the Grosse Lisse are super sweet and completely beautiful).

The tomatoes are cut in half and spaced out on an oven rack, then sprinkled with salt, and dried in the oven for hours at a low temperature (between 60-80c, as low as your oven will go, basically). To be safely kept at home they need to be as dry as you can possibly make them, like leather, I've read, and even though they were in the oven at 60c overnight they were still quite squishy so now they are in the oven for day 2 to see what happens. They are so beautiful when they are cut, I love the way the seeds are still green inside!

I will let you know what happens with the tomatoes. If they stuff up, never mind, hundreds and hundreds more where these came from!
*
These you are supposed to harvest as soon as you see a hint of the silks, but I forgot at first and left them a little longer.

Still, it didn't seem to matter and they were still tender inside and a little bigger for longer on the plant. Uncooked they were on the bland side, but once steamed they were delicious and nicer than anything we've bought in a supermarket before.

So far, out of the first block of 20 seeds sown, I have harvested 13 baby corns (I am keeping track of harvests with weights and numbers properly, for once!) I have also sown more baby corn successionally, so there are small, medium, and fully grown plants now, and yet more seeds in the packet for another round in a month or so.

We ate our corns together with a stirfy including yet more Redlegs spring onions (these just keep on coming and getting bigger and bigger. They were planted with a well over-packed punnet bought at a shop, but now I have seeds which I am also successionally sowing;

And a couple more Lebanese eggplants. These are small, but I am wary of letting them get too big and becoming inedible.

And in tomato news? The plants are still going great guns. My early planting of bought-in largish 'seedlings' has proved fruitful to say the least. I have picked almost 4kg in the last fortnight - not including the ones eaten while gardening and never weighed.
Some we eat fresh, some we cook into dinner, some have been frozen whole to cook with later in the year, and some I'm attempting to dry in the oven.
The tomatoes towards the top of this picture are either Tigerella or Green Zebra. I have managed to lose the label (I think it might have blown behind a pile of inaccessible renovation bits and bobs in the shed). The ones at the bottom of the picture are small Grosse Lisse. Now, those stripey numbers are a little on the bitter side if they're not totally ripe, I've found, so they were my chosen candidates for oven-drying (the Grosse Lisse are super sweet and completely beautiful).

The tomatoes are cut in half and spaced out on an oven rack, then sprinkled with salt, and dried in the oven for hours at a low temperature (between 60-80c, as low as your oven will go, basically). To be safely kept at home they need to be as dry as you can possibly make them, like leather, I've read, and even though they were in the oven at 60c overnight they were still quite squishy so now they are in the oven for day 2 to see what happens. They are so beautiful when they are cut, I love the way the seeds are still green inside!

I will let you know what happens with the tomatoes. If they stuff up, never mind, hundreds and hundreds more where these came from!
*
Tuesday, October 4, 2011
Easy peasy mushie pizza
After a long and busy day at work, what better for dinner than pizza? That would be pizza with home-grown mushrooms!

Aren't they lovely underneath?

And, because I am a nerd, I weighed them because I'd like to know if we get any real 'value for money' from this mushroom kit (the kit was $18).

I made a super easy yogurt pizza dough after reading about it on Fat Mum Slim's blog (one cup of self-raising flour and one cup of Greek yogurt, that is absolutely it!) and chef D put the rest of the pizza together out of random ingredients found in the fridge and pantry... bacon, two types of cheese, tinned tomatoes, baby spinach. He cooked down the mushrooms and spinach a little first.

Popped it into the oven - 200 degrees Celsius (390 Fahrenheit) on fan forced - for about 15 minutes until it was golden about the edges

Yum!

We ate the lot. No leftovers for lunch tomorrow, oops!

Aren't they lovely underneath?

And, because I am a nerd, I weighed them because I'd like to know if we get any real 'value for money' from this mushroom kit (the kit was $18).

I made a super easy yogurt pizza dough after reading about it on Fat Mum Slim's blog (one cup of self-raising flour and one cup of Greek yogurt, that is absolutely it!) and chef D put the rest of the pizza together out of random ingredients found in the fridge and pantry... bacon, two types of cheese, tinned tomatoes, baby spinach. He cooked down the mushrooms and spinach a little first.

Popped it into the oven - 200 degrees Celsius (390 Fahrenheit) on fan forced - for about 15 minutes until it was golden about the edges

Yum!

We ate the lot. No leftovers for lunch tomorrow, oops!
Friday, June 10, 2011
Coconutty Bread and Butter Pudding
Winter desserts: aren't they wonderful? And I've found a new one to add to my repertoire. It all started when I read about Malay Sweet Potato Donuts over at Kebun Malay-Kadazan girls blog. I like sweet potato, and I'm a sucker for sweet things, so I thought I'd try them and they were very nice, and very easy even for a frying-gumby like me to make. Then this recipe reminded me of a little book I have printed by Periplus called 'Classic Asian Cakes and Desserts'. I had a flick through, and the donuts happened to be in there, but I found another recipe I wanted to try: Coconut Bread Pudding.
I rummaged through the pantry and we had all the ingredients, so I made it - albeit quite modified - and we all tucked in and declared it Delicious (excepting MIL, who doesn't like bread pudding, but even she admitted it smelled pretty good), but I only remembered to take a photo towards the end.

Very glamorous...
So, being a good blogger and all, I needed to make it again (doesn't have anything to do with wanting to eat it again, and being home alone tonight so I can have a bigger serve, oh no, of course not...)
Here's the recipe as I made it (the original can be found in the book listed above):
COCONUTTY BREAD AND BUTTER PUDDING
Serves 4.
Ingredients
1 TB softened butter
2 eggs
1/3 cup brown sugar
3/4 cup coconut milk or cream
2/3 cup milk
1 TSP vanilla essence
6 slices of sour dough bread
1/3 cup sultanas
1 TB of white sugar for sprinkling
Method
1. Lightly brush the base and sides of a casserole dish. Preheat the oven to 180c (350f)
2. Butter both sides of the pieces of bread and set aside.
3. Beat the eggs and sugar together in a large bowl. Pour in the coconut milk, milk and vanilla essence, and mix well.
4. Add the bread and sultanas to the mixture and soak together for 20-30 minutes, stirring occasionally so that it soaks evenly.
5. Place the bread and sultanas into your dish and pour any excess milk mixture over it. Sprinkle evenly with the extra sugar.
6. Bake for 30-40 minutes, until it is golden and any custard around the edges is set.
7. Allow to cool for 10 minutes or so before cutting and serving with cream and/or ice cream.
8. Eat and Enjoy!
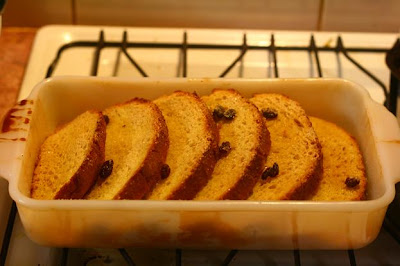
[I have to say, despite our masses and masses of Asian travelling, I have never seen bread and butter pudding anywhere in Asia yet so I'm not sure what is so 'classic' about this, but it's tasty anyway and a nice twist on an English traditional pudding]
I rummaged through the pantry and we had all the ingredients, so I made it - albeit quite modified - and we all tucked in and declared it Delicious (excepting MIL, who doesn't like bread pudding, but even she admitted it smelled pretty good), but I only remembered to take a photo towards the end.

Very glamorous...
So, being a good blogger and all, I needed to make it again (doesn't have anything to do with wanting to eat it again, and being home alone tonight so I can have a bigger serve, oh no, of course not...)
Here's the recipe as I made it (the original can be found in the book listed above):
COCONUTTY BREAD AND BUTTER PUDDING
Serves 4.
Ingredients
1 TB softened butter
2 eggs
1/3 cup brown sugar
3/4 cup coconut milk or cream
2/3 cup milk
1 TSP vanilla essence
6 slices of sour dough bread
1/3 cup sultanas
1 TB of white sugar for sprinkling
Method
1. Lightly brush the base and sides of a casserole dish. Preheat the oven to 180c (350f)
2. Butter both sides of the pieces of bread and set aside.
3. Beat the eggs and sugar together in a large bowl. Pour in the coconut milk, milk and vanilla essence, and mix well.
4. Add the bread and sultanas to the mixture and soak together for 20-30 minutes, stirring occasionally so that it soaks evenly.
5. Place the bread and sultanas into your dish and pour any excess milk mixture over it. Sprinkle evenly with the extra sugar.
6. Bake for 30-40 minutes, until it is golden and any custard around the edges is set.
7. Allow to cool for 10 minutes or so before cutting and serving with cream and/or ice cream.
8. Eat and Enjoy!

[I have to say, despite our masses and masses of Asian travelling, I have never seen bread and butter pudding anywhere in Asia yet so I'm not sure what is so 'classic' about this, but it's tasty anyway and a nice twist on an English traditional pudding]
Monday, May 30, 2011
Experimental Monday
 [Rewinding this one at 'And then there were four' because everything in it looks so delicious, and it's about peas, coriander and quinces, which are just a few of my most favourite things to eat.]
I hearby declare yesterday to be Experimental Monday (whether it's a stand-alone day, or a repeated one I am yet to decide).
On Sunday, on our drive out to the rose nursery, MIL, SP and I passed a number of places selling local produce. Naturally, we stopped at one and picked up a bag of cheap quinces, locally grown kiwifruit (a rarity!), some apples, and some very cheap persimmons. Oh, and a little frangipane tart, yummo!
Yesterday, D and I thought we'd try experiment #1 with the quinces. What if, we wondered, what if we cooked them in the slow cooker? We used the same recipe as last time, D washed them popped them into the slow cooker - whole! I was aghast! Until he told me that's how they did them at work and they were easy to peel afterwards, hmmm, ok, we'll see...

We covered them with the rest of the ingredients, the water, the fragrant spices, the sticky honey and sugar...

And then we went out, to our own house so D could help with the digging for the plumbing (becoming an interminable job, I'll not go on about it!) SP fell asleep in the car on the way over, so I was able to get loads of weeding done (I covered way more ground in weeding than the boys did in digging). The pea-straw peas were starting to take over and swamp everything, and there were lots of pea pods on them, so I thought it was time to pull them up. I ate a few of the peas (Experiment #2) and I thought they were OK, if a bit small. I got D to try one, and he declared it 'a bit bitter, ' but then he ate a few more and thought they were edible enough.
So we cleared all the pea-straw from the ground, stripped off the peas and then brought them home.

They were washed, and we tossed them whole into tonight's Green Curry (Experiment #3)

Along with masses of coriander straight out of MIL's garden.

And our curry was delicious (in Thai, "a raawy maa") So the verdict is in: Pea-straw peas are perfectly edible. I think the key is to pick them before they get too fat because then they're kind of hard and woody. Better to eat them whole, a bit like snow peas (this is also less work than shelling them!)
Then, back to our quince dessert, which by this point has filled the entire house with the most fabulous scent.

The skin had cracked open and begun to peel back, so once they were cool enough to touch I got going taking it off. And was it 'easy'? Erm... no. In my carefully considered opinion, peeling and coring cooked quinces is a bit of a bitch, and a messy one at that. Why I ended up doing it, instead of my chef who suggested it, is a bit of a mystery. But do they cook well in a slow cooker? They certainly do! It's a very easy way to prepare quinces, which is a bit of a time-consuming business, just peel and core them first to save sticky swear words flying all over your kitchen.
Eat, as usual, with cream and icecream.

Saturday, April 16, 2011
Relishing green tomatoes.
.Southern Australia has a wee problem with Portuguese millipedes, as mentioned previously. Among the favourite foods of these smelly critters, is almost ripe vegetables in the garden, or so it seems. It is somewhat distressing to have been watching a particularly large tomato, or perfectly shaped strawberry, waiting and waiting for it to be ready, to suddenly find a multitude of millipedes curled up inside it, chomping away. They are the reason we picked our rock melon early, and why we took about 2kg of unripe Amish Paste tomatoes off the bush.

But, you know, just because something isn't ripe, doesn't mean you can't still eat it, and what better to make with green tomatoes than tomato relish? (*Recipe at end*)
You need to give them a very good wash first, and try not to be too grossed out by the millipedes which drift to the bottom of the sink.

Then you cut them up into rough hunks, taking out the dodgy bits and the bugs. If desired, you can be a bit silly and arrange them from ripest to least ripe across the chopping board for a funky photo.

Also cut up one onion, some of the capsicum floating around in the bottom of the fridge, and a handful of chillies from the garden, maybe only a couple of chillies if you don't like things hot.
Bring some vinegar and sugar to the boil, then pile in your chopped vegetables. I recommend choosing a bigger pot than I did.

But even if you have misjudged the vegetables to pot size ratio, don't worry, let it sit and simmer gently and the tomatoes will quickly break down and begin to release lots of water and not threaten to overflow anymore. Over time, the tomato mixture will reduce down to about one third of the original volume.

When all of the excess water has gone from the mixture and it is quite thick, it is ready to be used. It's very rich, tangy and delicious. Excellent as a condiment for sandwiches, or on meat, or on top of leftover lasagne as I have been eating it. You could probably sterilize some jars and store it for some time, but at the rate it's being eaten in this house I'm glad I didn't bother and settled for a glamorous Ikea container instead.

RECIPE
Tomato Relish
(Recipe from Chef D)
Adjust quantities to suit what you have available.
In a saucepan, mix together 1/2 cup brown sugar and one cup of white wine vinegar. Bring to the boil, then simmer gently.
Add 1.5kg of chopped tomatoes, 1 chopped onion, 1 chopped capsicum and fresh chopped chili to taste.
Stir all together, then simmer gently until it is well reduced and the excess water has gone. This will take some time, perhaps 1-2 hours depending on how slowly you are cooking it.
When it has cooled, it is ready to eat.
Enjoy!
Monday, March 21, 2011
Poached quinces and other delights.
The nice thing, or one of the many nice things about living at MIL's house deep in the hills, is the close proximity to weekend markets. On Sunday MIL, SP and I took a quick visit to the Uraidla Market, which is about 10 minutes drive down the road into the 'real' countryside. It's a pretty little drive with it's hillsides of bushland, apple orchards, and leek fields.
The Uraidla Market is small, and yet it seemed to have everything we could want. Most of it was in the town hall, with a couple of extra stalls and obligatory sausage sizzle outside. Lots and lots of fresh local produce for sale (even fish!), plus jams, award winning olive oils, marinated olives (YUM!!), plants, Devonshire teas and craft works. Just my kind of thing.

We came home with plenty of fruit and veg and some treats to see us through the week.

Just for fun I bought some beautiful quinces. I have not eaten quince in such a long time, this most underrated of fruits.

I flicked through the cookbooks but no recipe jumped out at me, so off to the Internet where I found a recipe for rosy poached quinces. Quinces cannot be eaten raw, not unless you like that astringent 'mouth full of fluff' feeling; I don't recommend it. I mention this because they do look very much like you could snack on a piece of two as you cut them up, and I do not want you to be tempted!
They are supposed to be hard to peel and core, but I didn't think they were. Perhaps it was just luck? They do, however, oxidize to brown very quickly. I piled them straight in the simmering poaching syrup (is it still called a court bouillon if it's sweet? Probably not.).

And added a hat, as per instructions (watch out for the scalding steam if you lift it).

And then I sat in the rainlight-drenched living room, eating wholemeal toast with blue cheese, typing up this post and knitting (not at the exact time I was typing. I am not that clever) while I waited for it to cook, cinnamon infusing not just the quinces, but the air as well, it smells like autumn. Delicious.
Quinces blush as they cook, and the longer they cook the pinker and darker and richer they become.
 \
\


They will keep for a week in their poaching liquid in the fridge, and after you have eaten the fruit pieces (I recommend real cream and icecream) you can reduce the syrup into a jam which is wonderful with cheese.

Sublime.

The Uraidla Market is small, and yet it seemed to have everything we could want. Most of it was in the town hall, with a couple of extra stalls and obligatory sausage sizzle outside. Lots and lots of fresh local produce for sale (even fish!), plus jams, award winning olive oils, marinated olives (YUM!!), plants, Devonshire teas and craft works. Just my kind of thing.

We came home with plenty of fruit and veg and some treats to see us through the week.

Just for fun I bought some beautiful quinces. I have not eaten quince in such a long time, this most underrated of fruits.

I flicked through the cookbooks but no recipe jumped out at me, so off to the Internet where I found a recipe for rosy poached quinces. Quinces cannot be eaten raw, not unless you like that astringent 'mouth full of fluff' feeling; I don't recommend it. I mention this because they do look very much like you could snack on a piece of two as you cut them up, and I do not want you to be tempted!
They are supposed to be hard to peel and core, but I didn't think they were. Perhaps it was just luck? They do, however, oxidize to brown very quickly. I piled them straight in the simmering poaching syrup (is it still called a court bouillon if it's sweet? Probably not.).

And added a hat, as per instructions (watch out for the scalding steam if you lift it).

And then I sat in the rainlight-drenched living room, eating wholemeal toast with blue cheese, typing up this post and knitting (not at the exact time I was typing. I am not that clever) while I waited for it to cook, cinnamon infusing not just the quinces, but the air as well, it smells like autumn. Delicious.
Quinces blush as they cook, and the longer they cook the pinker and darker and richer they become.


They will keep for a week in their poaching liquid in the fridge, and after you have eaten the fruit pieces (I recommend real cream and icecream) you can reduce the syrup into a jam which is wonderful with cheese.

Sublime.

Thursday, December 30, 2010
Gingerbread and biscotti recipes
Just to round things out, here are the gingerbread and biscotti recipes I used this year.
Gingerbread
(paraphrased and adapted from Donna Hay magazine, issue 6, p 96)
125g (4 oz) butter, softened
1/2 cup brown sugar
1/2 cup (4 fl oz) golden syrup
2 1/2 cups plain (all purpose) flour
2 tsp ground ginger tsp bicarb soda (baking soda)
Preheat the oven to 190 degrees celsius (375 F).
Place the butter and sugar in the bowl of an electric mixer and beat until light and creamy. Add the golden syrup and beat well. Add the flour, ginger, and bicarb soda and stir to combine. Knead the dough lightly to form a smooth dough.
Roll out the dough on a floured surface, or between two sheets of non-stick baking paper to 5mm (1/4") thick. Use a cookie cutter to cut out shapes from the dough and place them on a baking paper lined tray. Be careful! The dough will be very soft.
Bake for 8-10minutes or until golden brown. Cool on the trays.
Ice with lemon icing. The lemon with the ginger 'lifts' the flavour considerably.
Makes 25.
Biscotti.
(paraphrased and adapted from The Essential Mediterrananean Cookbook, Murdoch Books, p 148)
2 cups plain (all purpose) flour
1 tsp baking powder
1 cup (8 oz) caster sugar
3 eggs
1 egg yolk
1 tsp vanilla essence
1 tsp grated orange rind
3/4 cup (3.5 oz) natural pistachio nuts
Preheat the oven to 180 degrees Celcius (350F).
Line two baking trays with non-stick baking paper and dust lightly with flour.
Sift the flour and baking paper into a large bowl. Add the sugar and mix well. Make a well in the centre and add 2 whole eggs, the egg yolk, vanilla essence and orange rind. Stir until just combined. Mix in the pistachios. Knead for 2-3 minutes on a lightly floured surface. The dough will be stiff at first but quickly become soft. Add a little water if necessary.
Divide the mixture into two equal portions and roll each into a log about 25cm (10") long and 8cm (3") wide. Place the logs on the trays, allowing room for spreading. Slightly flatten the tops.
Beat the remaing egg and brush over the logs to glaze.
Bake for 35 minutes and remove from the oven.
Reduce the oven temperature to 150 celcius (300F).
Allow the logs to cool slightly, then cut them into 5mm slices.
Place slices flat side down on the trays.
BAke for 8 minutes. Turn the over and bake for a further 8 minutes, or until slightly coloured and crisp and dry.
Transfer to a wire rack to cool.
Gingerbread
(paraphrased and adapted from Donna Hay magazine, issue 6, p 96)
125g (4 oz) butter, softened
1/2 cup brown sugar
1/2 cup (4 fl oz) golden syrup
2 1/2 cups plain (all purpose) flour
2 tsp ground ginger tsp bicarb soda (baking soda)
Preheat the oven to 190 degrees celsius (375 F).
Place the butter and sugar in the bowl of an electric mixer and beat until light and creamy. Add the golden syrup and beat well. Add the flour, ginger, and bicarb soda and stir to combine. Knead the dough lightly to form a smooth dough.
Roll out the dough on a floured surface, or between two sheets of non-stick baking paper to 5mm (1/4") thick. Use a cookie cutter to cut out shapes from the dough and place them on a baking paper lined tray. Be careful! The dough will be very soft.
Bake for 8-10minutes or until golden brown. Cool on the trays.
Ice with lemon icing. The lemon with the ginger 'lifts' the flavour considerably.
Makes 25.
Biscotti.
(paraphrased and adapted from The Essential Mediterrananean Cookbook, Murdoch Books, p 148)
2 cups plain (all purpose) flour
1 tsp baking powder
1 cup (8 oz) caster sugar
3 eggs
1 egg yolk
1 tsp vanilla essence
1 tsp grated orange rind
3/4 cup (3.5 oz) natural pistachio nuts
Preheat the oven to 180 degrees Celcius (350F).
Line two baking trays with non-stick baking paper and dust lightly with flour.
Sift the flour and baking paper into a large bowl. Add the sugar and mix well. Make a well in the centre and add 2 whole eggs, the egg yolk, vanilla essence and orange rind. Stir until just combined. Mix in the pistachios. Knead for 2-3 minutes on a lightly floured surface. The dough will be stiff at first but quickly become soft. Add a little water if necessary.
Divide the mixture into two equal portions and roll each into a log about 25cm (10") long and 8cm (3") wide. Place the logs on the trays, allowing room for spreading. Slightly flatten the tops.
Beat the remaing egg and brush over the logs to glaze.
Bake for 35 minutes and remove from the oven.
Reduce the oven temperature to 150 celcius (300F).
Allow the logs to cool slightly, then cut them into 5mm slices.
Place slices flat side down on the trays.
BAke for 8 minutes. Turn the over and bake for a further 8 minutes, or until slightly coloured and crisp and dry.
Transfer to a wire rack to cool.
Belated baking
So it's days and days after Christmas, but I'm getting around to the Christmas Baking post. It's 39 degrees celcius outside today, so the only gardening going on is lots of water to keep the plants alive (tomorrow - NYE - is forecast a whopping 43 degrees celcius).
So, as you might have gathered, Christmas to me means going crazy in the kitchen. I like to give baked goods as gifts.

SP helped in her own way.

This year I started with orange and pistachio biscotti, and almond biscotti.

Then I made Viennese fingers (recipe)

And Viennese 'drops' too.

The cookie trees were a bit of a hit. I was going to do all vanilla cookies (recipe), and then I got bored and added in gingerbread too, all iced with lemon icing.

The leftover biscuits made a bigger tree, which we took to my mother-in-law's house for her annual Christmas Eve birthday party.


D made his famous Christmas puddings.

He also used my leftover biscuit dough to make pastry for mince pies by re-kneading the dough with an egg.

Everything, naturally, was delicious. Perhaps the best of all was the bumper raspberry crop out of my MIL's garden.

Merry Christmas to all readers, and may you have a Happy New Year. All the best for 2011!

So, as you might have gathered, Christmas to me means going crazy in the kitchen. I like to give baked goods as gifts.

SP helped in her own way.

This year I started with orange and pistachio biscotti, and almond biscotti.

Then I made Viennese fingers (recipe)

And Viennese 'drops' too.

The cookie trees were a bit of a hit. I was going to do all vanilla cookies (recipe), and then I got bored and added in gingerbread too, all iced with lemon icing.

The leftover biscuits made a bigger tree, which we took to my mother-in-law's house for her annual Christmas Eve birthday party.


D made his famous Christmas puddings.

He also used my leftover biscuit dough to make pastry for mince pies by re-kneading the dough with an egg.

Everything, naturally, was delicious. Perhaps the best of all was the bumper raspberry crop out of my MIL's garden.

Merry Christmas to all readers, and may you have a Happy New Year. All the best for 2011!

Subscribe to:
Posts (Atom)